Remote maintenance and automation for heterogeneous landscapes with free software
A new open-source software manages everything from a central dashboard - whether cloud, multi-cloud, hybrid cloud, co-locations and the PCs in the office.
The days when all servers and employee PCs were located in a common subnet are long gone. The IT infrastructure has spread across various locations, service providers and networks. And the devices at colleagues' workplaces at home often still fall under the purview of system administrators.
Keeping track of an ever-growing number of servers and devices is a problem for many IT departments.
Which systems is a team responsible for? Where are they located? And how do you get remote access quickly? Wikis are a widely used solution. But these are only helpful as long as they are kept up to date.
The colleague is on vacation, you urgently need to fix a server error, and the guesswork begins: How do I get on the system? Hopefully, the colleague was disciplined and the server list and documentation with remote access paths are up-to-date.
Remote access does not usually mean that you enter the IP address of the remote system into the remote desktop or SSH client, and you are logged in. Firewalls and routers allow this only in rare cases. Jump hosts, SSH chains or VPNs are common solutions to reach systems behind firewalls. But such solutions involve effort in the case of a VPN. Solutions like jump hosts require system administrators to document. Colleagues must be able to look up which jump host they need to use for which system. In addition, user accounts on the jump hosts involve a certain amount of administration.
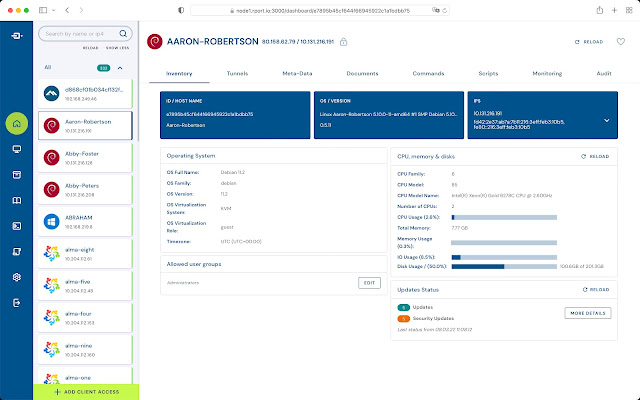
Central dashboard
Using RPort starts with a graphical user interface. This is opened in the browser. In the inventory, all systems on which the RPort client was previously installed appear. Internal and external IP addresses, the location and many other details can be seen. The client always keeps this information up to date. With tags and an encrypted key-value store, the system information can be extended.
If you manage many systems with RPort, you can sort them into groups.
From the dashboard, you can connect to the systems with the click of a button, or execute commands and scripts. The latter can be saved in a library for reuse.

Server installation in a few minutes
To install the RPort server, the developers recommend a small virtual machine in the cloud. If the RPort server is accessible via the public Internet, you can include servers in different networks and locations. However, installation in a private network is also possible.
For the RPort server, a VM with Debian Buster and 1 GB Ram is sufficient. The costs amount to 3-7 $USD per month, depending on the provider.
If you start the RPort server at Azure, AWS EC2 or Google Compute, you have to pay attention to the correct firewall settings when you create the VM. In addition to SSH port 22, you must allow TCP ports 80 and 443 for the web server and the TCP port range 20000-30000 in the firewall. With cloud providers such as Hetzner, Scaleway or Digitalocean, for example, firewalls are optional and new virtual machines have no restrictions. To get cheap small systems at Azure, set a filter "0-2 GB RAM" and "1-2 CPUs". This will get you, for example, the B1s or B1ls series. The latter is sufficient for up to 100 managed systems.
After the virtual machine is available, you should update it with sudo apt-get update && sudo apt-get dist-upgrade and restart it.
After reboot, switch to the root account with sudo -i and run the RPort Cloud installer:
curl https://get.rport.io|bash
If running a script unchecked with root privileges is too tricky, use
curl -O rport-installer.sh https://get.rport.io
and manually execute the steps contained in the script.
The installation script downloads RPort from Github, creates a user and the necessary configuration files. It also creates a random FQDN in the subdomain *.users.rport.io. The developers want to make testing as easy as possible, but also as secure as possible. The FQDN is needed to generate valid SSL certificates via Let's Encrypt. If you want to use your own hostname after the first test, you can find instructions on the project's help pages https://kb.rport.io.
After the installation script has run through, you will be shown a URL and a randomly generated initial password. Open this URL in your browser and log in. Your RPort server is ready for use.

Client installation
For remote access to servers to work behind routers and firewalls, you must install the RPort client on each system. The client establishes the connection from the inside to the outside. So that these connections do not have to be specially released in firewalls, the RPort client uses the HTTP protocol and port 80 for the first connection setup. The use of an HTTP proxy server is also possible. Once the HTTP connection is established, an SSH connection wrapped in HTTP is established. SSH connections have been considered robust and extremely secure for years.
The client installation is done quickly. On the web interface, click on the gear in the upper-right corner and then on "Client Access". Click on "Install Client" to display two scripts. These contain a randomly generated pairing code which is valid for 10 minutes. Copy the script to the clipboard and run it in PowserShell or Linux console. Using the pairing code, the client connects directly to your server.
The pairing service https://pairing.rport.io only generates and transfers the client configuration and does not intervene in the data connection. This is established directly between the client and the server. You can also download the client installation scripts and distribute them via file server or USB stick.
With a click on the reload button in the upper-left corner, new clients immediately appear in the inventory.
If clients do not have direct access to the Internet, you can enter an HTTP proxy in the client configuration file rport.conf. An example is already included in the file.

Tunnel instead of VPN
How do you quickly and easily get to SSH port 22 or remote desktop port 3389 on a network to which there is no direct connection? In most cases, the so-called Network Address Translation (NAT) obstructs the direct path to the destination.
NAT is not a problem for RPort. Thanks to the tunneling capabilities, you can reach any TCP port on the target system and neighboring systems.
Tunnels are only active as long as they are needed. This saves resources.
Select a client from the inventory on the left. Click the "Add Tunnel" button on the right. Depending on the operating system, an SSH or an RDP tunnel is preselected. Also, the protection of the tunnel is preset with an IP address lock and your current public IP address is pre-filled. Click on "Add Tunnel" to set up the tunnel. This takes only a fraction of a second.
The tunnel ends on a random port on your RPort server. You can now connect to it via RDP or SSH. Alternatively, click on the "Launch Tunnel" icon. The standard SSH or remote desktop program will open. The connection settings are already entered.
Now you can reach any server - even those behind NAT routers - without VPN or jump host via SSH or RDP.
Each RPort client can also serve as a network bridge to other systems. This allows you to reach servers on which RPort is not installed. But also access to web configurations of printers or NAS systems is possible.
To achieve this, create a new tunnel and select Service Forwarding as the "Service to access" item. Then select destination port and a destination address.

Execute commands and scripts from the browser
If you installed the client using the pairing code, running commands and scripts is allowed.
As soon as you select a client on the left, you can expand the "Commands & Scripts" area on the right. The commands and scripts are transferred to the client and executed without further authentication. You can see the result in the browser. Commands are executed under Windows with cmd.exe and under Linux with /bin/sh. With the scripts, you also get access to the PowerShell under Windows.
If you use a script frequently, you can save it in the library.
Running commands and scripts is not limited to individual systems. In the top navigation, select "Command" or "Scripts". This allows you to execute commands on multiple systems in parallel.
Now, if you want to introduce security concerns because the RPort server can take full control of all connected systems by executing commands, take a look at the client configuration file rport.conf
There is the following section.
You have the option to disable the execution of commands and scripts. The server cannot override these restrictions. Likewise, you have the option to allow only individual commands or to prohibit specific commands. For example, it is possible to allow only restarting of services and server reboot.
Note that the rules are not applied to scripts. Once the /bin/sh, cmd.exe, or PowerShell.exe commands are allowed, running scripts is possible. The content of the scripts is not checked against the rules.
Enable two-factor authentication
If you allow scripts and commands to run, it is advisable to protect the RPort server with two-factor authentication. In addition to username and password, you must enter a one-time password when you log in. This one-time password is sent to you by e-mail or push message.Open the server's configuration file /etc/rport/rportd.conf. This already contains examples of two-factor authentication. Either enter the credentials for an SMTP server, or specify your keys for the Pushover.net push messaging service. In addition to the examples in the configuration file, you can find more information about setting up two-factor authentication in the project's help portal.
RPort is open in all directions
RPort can be operated not only via the web interface. Scripting and integration with other software or routines is possible. Everything you do via the graphical interface can also be done via RESTful API. And this is how RPort has already penetrated the market for home office solutions. Using a self-service portal, you can allow employees to access the remote desktop of the office PC from their home PC. Via an API call, RPort is then instructed to provide the tunnel for the current IP address of the home office.But companies from the industrial digitization sector also use RPort. Not every project starts on a greenfield site, but in a so-called brownfield. That means you have to work with what you find. And in the case of operating systems, these are often veterans believed to be dead. Since the RPort client has no dependencies on external programs or libraries, it also runs on old operating systems.
Thanks to the RESTful API, it creates the possibility to remotely control just about any system. This is especially interesting for Microsoft Windows because technologies like WinRM and PowershellRemote are complicated and not available in every version. RPort creates a simple and universal interface for remote control here.

Interesting post! This is really helpful for me. I like it! Thanks for sharing! Remote Usability Testing service provider in india
ReplyDelete